Pages

Monday, May 28

landscaping overhaul


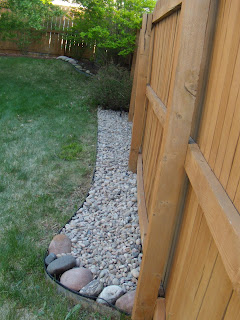
Springtime reveals the harsh effects of the winter. Let's just say our landscaping needed some work.  We had mulch beds along our fence line.  The mulch had broken down and the weed barrier fabric was left exposed.  Nick and I decided river rock was the way to go since we had other landscaping finished that way.

So a couple weeks later about 9645 pounds of river rock was dropped in our driveway.  After a few hours of laying new weed barrier fabric and rock, we had most of the fence line done.   

I found that the stakes that come with the weed barrier fabric are unnecessary if you're laying rock.  They easily broke when pushing them into the ground.  If you just use a couple rocks to pin the corners of the fabric before you cover it, the weight of all the rock will do a fine job of keeping the fabric in place.

Now we focused our attention to the existing rock beds with the quarter of the rock pile that was left in our driveway.  Pulling up the weeds and grass was the first step, and filling in the new rock was the second step. 

Nick did a good job with the large flat pathway rocks by pulling up all the existing river rock and the pathway rocks, digging a little deeper, laying the weed barrier fabric, and filling it all back in.

Be sure to have some quality rubber grip gloves, some pruning shears for difficult weeds and baby trees, and a good flat edge shovel.  We used our sharp edge shovel as well just to double team the work and it quickly dulled, so avoid that when you can.

Overall I would say the outcome of this renovation is amazing.  Hopefully the maintenance will also be lower for the years to come as well.

kind of before
after
before
after
before
after

Sunday, May 27

capri take in

One pair of my denim capris were in dire need of a new shape.  These capris probably been hanging out in my dresser for almost a decade.  They have a little flair at the ends which is not exactly what I like currently.


before
after


Cost: Free
Time: 30 minutes
Needed:
  • old capris (owned)
  • sharpie (owned)
  • sewing machine (owned)
  • cutting board (owned)
  • rotary cutter (owned)

1.  Pinch it.  With your capris on, take a hold of the inner leg material pinching off the excess fabric you would like to remove keeping the seam centered.  When you are happy with the amount, mark the inside of the hem line in the front where the material was touching while pinching.
2.  Mark it.  Take the capris off and turn them inside out.  Lay the capris flat with the front side up.  Find on the inner seam where the top of your knee would be and mark that as well.  Draw a line to connect the bottom hemline mark to this new mark. 
3.  Sew it.  Using a straight stitch, start at the knee mark and ease your way in going all the way to the bottom hem line mark.  Be sure to line up your bottom of the capris nicely before stitching/backstitching on the hem.  Repeat with the other leg.
4.  Trim it.  Take your rotary cutter and trim away the excess material leaving about a quarter inch to zigzag the new inner seam.
5.  Wear them.  Turn them inside out and give them a try.  You can always take more in, so starting with conservative marks and working your way in until you find a good fit is always a good idea.

Wednesday, May 23

top ten: save money

  1. Go generic.  Sometimes it is alright to be a little generic, but check the ingredients and maybe do a little review researching before trying a generic of your fave beauty or food product.  There are a few generics that I swear the only difference is a few dollars like St. Ives Apricot Scrub vs. the Walgreen's knockoff.  Here are some more products you should consider generics for as a replacement.
  2. Stick to the basics.  I have family members that will buy the same shirt in five colors if it fits them well and is a fair price.  Typically I do this to a lesser degree, but I get basics that suit all occasions and splurge on accessories to vary an outfit.  You'll find your wardrobe lasts longer because nothing really goes out of style, but it may just need a new scarf or belt for an update.
  3. Handmade is awesome. At some point attempt to make something by hand that you need.  Anything from slippers to a throw rug, just try to create something on your own without running to the store.  It will be a proud achievement since you taught yourself something new (maybe Pinterest or YouTube helped).  Even more brownie points if you upcycle materials you already have at home to generate your handmade item.
  4. Be loyal.  If you have a favorite department store, you should check in on their e-mail subscriptions, credit card offers, customer reward cards, website offers, and mailed ads for deals that can sometimes be combined for fabulous savings. Kohl's is a great example of a store that provides multiple avenues of savings that they allow to be used in conjunction with one another.  Also check out Kathy Spencer's website for more ideas and deals.
  5. Get a library card.  Most of our entertainment comes from the library these days.  Especially since libraries are not just books anymore.  We checkout DVDs to watch on the weekends, CDs to listen to at home, and then of course books to feed the habit.
  6. Buy in bulk.  There are always going to be items that you will need.  Most of them come at a much better rate if you buy in bulk and can store them until you need them.  This stops you from buying just a little bit at a time at full price. Items like toilet paper, paper towels, detergent, dryer sheets, tissues, and even tampons are my typical bulk items.   
  7. Run your car into the ground.  Obviously if the cost of repairing your older car starts to become a burden it might be more cost effective to buy another one.  If you are able to keep your clunker around, you'll save monthly by not having a car payment and as a bonus older cars are typically less to insure.
  8. Pack your lunchbox.  This one is hard to stay committed to throughout the week, but the weeks I am faithful to this I tend to keep about fifty bucks in my pocket.  The trick seems to be setting aside time to actually prep and pack the meal with the food you already have at home.  I find that less perishable items get tossed out since I'm using only what I already have in the cupboard.  Need some inspiration? Check out these lunch ideas.
  9. Girls night in.  A night out with the girls can be expensive, and to help cut that down try inviting your girlfriends over for a relaxed evening at your place.  Preparing a meal, appetizers, and drinks at home is more affordable.  You can even set up a rotation of who will host each month.  
  10. Jazzercize.  Well maybe not, but exercising a little more is good for you and not a big expense.  You can start with an after dinner walk, but I bet you will find that it is addictive and will take up more of your time before you know it.  You don't have to have a gym membership to go for a neighborhood run or pick up a game at the park.  If you have specific goals in mind, you should look at My Fitness Pal or another online tool to help you stay on track for free.

Saturday, May 19

felt kindle cover

Nick gave me a kindle fire for Christmas. I immediately fell in love with all its glory and wanted to protect it.  Most of the kindle covers offered online and at the store were not cozy or unique so I decided to make my own cover. 

Hopefully no one takes offense to this, but I used a Nicholas Sparks book for my kindle cover since I just could not get into his stuff.


Cost
: $4 

Time: 30 minutes
Needed:
  • 8" x 5" x .5" hardcover book (owned)
  • 3  8.5" x 11" felt pieces ($1)
  • 16" 1.5" wide elastic ($2)
  • cutting board (owned)
  • rotary cutter (owned)
  • ruler (owned)
  • hot glue gun (owned)
  • hot glue gun sticks (owned)

1.  Destroy your book.  In order to make room for your kindle, you'll need to rip out all of the pages inside the hardcover while trying to not damage the spine's structure.  I found taking a box cutter to cut the bulk of the pages away from the cover also works well.
2.  Make it cozy.  Now that you have a book cover sans pages, it needs a new look and feel.  Measure your cover laying completely flat.  It should be about 8.5" by 11", so take one piece of felt for the interior of the cover and hot glue it into place.  I found that laying a thick line of glue around the edges looked better than trying to cover the entire surface with glue.  Press firmly and let dry for a couple minutes.
3.  Close it up.  Take the elastic and hot glue the ends together to make a circle.  After a few minutes slip the elastic circle over the cover while it is closed so that the elastic can lay flat against the front and back exterior.  Use your ruler to position the elastic about a half inch from the edges where the cover opens/closes. Glue generously only where the elastic is touching the back exterior of the cover.
4.  Cover it.  Open the cover by moving the elastic over from the front exterior cover.  Lay the cover flat and measure another piece of felt for the exterior.  Glue into place like the interior piece, but this time you'll need to carefully work where the elastic is secured on the back. 
5.  Frame it.  Now that you have a basic felt cover, it needs a couple more pieces of felt to secure the kindle so it won't slip out of the side.  Take your ruler, cutting board, and rotary cutter to cut out a 3" square, and then cut that in half diagonally.  Take the two triangles and position where they will hold your kindle in place inside like the first photo shows.  Glue into place, and don't worry about leaving enough slack for the kindle to slide in because this will loosen a little with use.
6.  Use it.  This is also a good time to adorn the exterior with embellishments if you would like.  I suggest fabric paints, appliques, sequins, studs, etc.

Tuesday, May 15

finished fireplace

After many coats of yellow and white paint, the red fireplace is no more!  About a week ago, I was contemplating what colors to paint over our obnoxiously red fireplace. I showed Nick the rough concepts painted in photoshop, it was clear that white worked best for us.  


I learned a few things to keep in mind for my next painting project.  

Do not skimp out on your painters tape.  The blue tape was always my default, but after using the green Frog tape I will never go back to the blue.  It adhered better to the textured wall leaving a nice clean line.  There were only a few exceptions where it was hard to apply pressure to seal correctly.


If you are trying to cover a dark paint with a lighter paint it is probably best to apply some primer.  It definitely took many coats to make sure the red did not tint the new paint.  


Last takeaway from this experience: I will think twice before our next home if it has textured walls.


Saturday, May 12

deck furniture

Just shopping around online and doing a little daydreaming.  So far our deck is pretty bare except for Nick's grill.  We have family coming in next month and are hoping to do some outdoor entertaining.  

Here are a few items that I think would complete our deck and make it a more comfortable area. The exterior of our home has some color, so neutral furniture should work nicely. Thoughts?


Umbrella - Target, Umbrella Base  - Kohl's, Chair Cushion - Pier One, Chair - Kohl's, Table - Target, Lounger - Kohl's

Thursday, May 10

lemon microwave cleaner


So when life gives me lemons, I clean my microwave.

If you got a microwave splattered with nuked leftovers, this simple little fix will save you some time and elbow grease.

Cost
: less than a dollar

Time: 10 minutes
Needed:
  • 1/2 lemon
  • water
  • small microwavable bowl
  • sponge

1. Cut it up. Half a lemon on a cutting board.

2. Squeeze the snot out of it. Take one half of the lemon and squeeze the juice into the microwavable bowl until it runs dry.
3. Add H20. Pour about a cup worth of tap water into the bowl.
4. Heat it up. Microwave for about five minutes, or at least make sure you see steam appearing for a couple minutes.
5. Scrub a dub dub. Carefully remove the hot bowl and dump the contents in the sink. Take a damp sponge and clean away the crusties. You'll be amazed how easily the little grease spots wipe away.

Sunday, May 6

fireplace paint colors

Nick and I bought our first home last summer, and we are getting around to making it more our own now that the dust has settled.  We are not in love with the current state of our living room.  It definitely has been overlooked in order to get more important rooms finished (like my craft room).


We are trying to brainstorm paint options since the current combination does not work for our furniture.  We are planning to keep the yellow paint for now, but the red has to go.  The back wall the clock rests on will most likely be painted yellow to better define a low mantle.  Our coffee and end tables have a dark espresso finish.  The couch and recliner have light brown fabrics.  

Below are some rough stabs at what a few colors may look like for the mantle, but what colors do you think would work the best?  Thanks for your input!

black

white

brown

just for funzies: turquoise

Saturday, May 5

jewelry stand

This is a Pinterest find that I tried out last fall.  It was originally supposed to be a treat stand, but I thought a few changes and it would work great as a jewelry stand on my dresser.  My budget was low for this one so I went to the local thrift shop to get stocked up on unique glass items.  BTW the bird necklace holder is available at Target.


Cost: $14
Time: 3-5 hours (mostly paint dry time)
Needed:
  • cake stand ($4)
  • 2 plates ($2)
  • candy dish ($1)
  • ring holder ($2)
  • set of 6 cordial glasses - only 3 were necessary ($5)
  • white spray paint (owned)
  • hot glue gun (owned)
  • glue sticks (owned)
  • drop cloth or newspaper (owned)

1.  Gather your loot. Obviously, you do not have to use the same items as I did to create your jewelry stand.  Above is just a suggestion list, so get as creative as you can to make your own custom stand.  Something similar to a cordial glass like a candlestick holder will be necessary though to give your jewelry some space vertically.
2.  Layer your tiers.  Before painting or gluing, spend some time stacking your items (carefully) to see what arrangement suits your needs best.  Make sure that the base layer (cake stand in my case) will support the weight of your other items before getting too invested.  Be sure that your spacer items (cordial glasses/candlestick holders) are strong enough to also prop up the remaining items.
3.  Paint away.  Now that you have a mental plan of the jewelry stand's construction, take it all apart and space out on your drop cloth or newspaper in a well ventilated area like a garage.  Shake that spray paint like a crazy person and start to cover all the exposed surfaces of your items.  Let dry for an hour or two if you coated the paint on thick.  Turn over your items and spray any other surfaces that need covered and wait for that to dry.
4.  Glue time.  Be sure that your items are completely dry before proceeding.  Prep your glue gun with a glue stick and plug it in.  Align a spacer item on your base layer, and even lightly mark it in place if you do not dare eye it.  Take the glue gun and cover any bottom surface of the spacer item and push down in the center of the base layer.  After a few minutes to let the glue harden, align the next item, cover the connecting surface with glue, and push it down in place.  Continue this pattern until you have the top piece glued in place.
5.  Spot check.  It is easier to see any bits you may have missed with the paint at this point.  Do some touch ups if need be after the glue has completely secured the items. 
6.  Use it!  Arrange your jewelry on the flat surfaces as you like, and the edges are great to hang your dangly earrings.  I even keep my headbands wrapped around the center on one level.  Whatever accessory you have, I'm sure you can find a place for it on your new stand.